Transforming Your Space with Glass Mosaic Tiles: A Complete Installation Guide
This post may contain affiliate links which might earn us money. Please read my Disclosure and Privacy policies here
Glass mosaic tiles have captivated homeowners and designers for decades with their luminous beauty, versatility, and ability to transform ordinary spaces into stunning focal points. Whether you're renovating a bathroom, updating a kitchen backsplash, or creating an eye-catching feature wall, these translucent tiles offer endless creative possibilities.
However, working with glass mosaics requires specific techniques and knowledge to achieve professional results that stand the test of time.
Why Glass Mosaic Tiles Remain a Popular Choice
The enduring appeal of glass mosaic tiles lies in their unique properties. Unlike ceramic or porcelain alternatives, glass tiles reflect and refract light, creating depth and visual interest that changes throughout the day. Their non-porous surface resists moisture, staining, and bacterial growth, making them ideal for wet areas like bathrooms and kitchens.
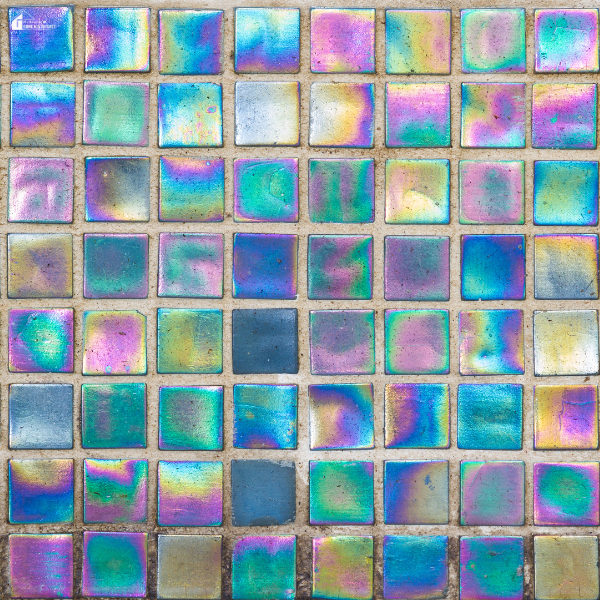
Modern manufacturing techniques have expanded colour options dramatically, offering everything from vibrant jewel tones to subtle metallics and iridescent finishes. This versatility allows glass mosaics to complement any design style, from contemporary minimalism to traditional elegance.
Essential Preparation for Successful Installation
Assessing and Preparing Your Surface
Proper surface preparation determines the success of your entire project. Glass tiles are translucent, meaning any imperfections, discolouration, or inconsistencies in the substrate will show through the finished installation. The surface must be completely flat, smooth, clean, and structurally sound.
Remove any loose paint, wallpaper, or previous adhesive residue. Fill cracks and holes with appropriate filler, then sand smooth once dry. For bathroom installations, ensure the surface is properly waterproofed using tanking systems or waterproof backer boards. This preventative step protects against moisture damage that could compromise your installation over time.
Choosing the Right Adhesive
Not all tile adhesives suit glass mosaics. Standard grey cement-based adhesives can telegraph through transparent tiles, creating an unattractive, shadowy appearance. Instead, opt for white polymer-modified thin-set adhesive specifically formulated for glass tiles.
These specialised adhesives offer several advantages: they provide excellent bond strength, accommodate the minimal absorption rate of glass, and their white colour enhances the tiles' translucency rather than diminishing it. Never use mastic adhesives with glass tiles, as they lack the necessary strength and can discolour over time.
Planning Your Layout for Professional Results
Creating a Balanced Design
Before applying any adhesive, plan your layout carefully. Glass mosaic sheets typically come in 300mm squares, making pattern planning straightforward. Start by finding the centre point of your installation area and work outwards, ensuring symmetrical placement of tiles around focal points like mirrors, windows, or fixtures.
Dry-lay several sheets to visualise the final result and identify where cuts will be necessary. This preview allows you to adjust your layout to minimise waste and avoid awkward small cuts along edges. Strategic planning prevents design imbalances that become glaringly obvious once installation is complete.
Understanding Spacing and Grout Lines
Most glass mosaic sheets arrive pre-mounted on mesh backing with consistent spacing between individual tiles. Maintaining uniform grout lines between sheets requires careful alignment during installation. Use tile spacers between sheets to ensure consistent gaps that match the spacing within each sheet.
Inconsistent grout lines create an amateurish appearance that detracts from the tiles' beauty. Take time to align each sheet precisely before the adhesive sets, stepping back periodically to check that grout lines remain straight and even across the entire installation.
Installation Techniques That Ensure Longevity
Applying Adhesive Correctly
Apply adhesive using a notched trowel with the appropriate depth—typically 3-6mm notches for mosaic tiles. Spread only enough adhesive to cover the area you can tile within 15-20 minutes, preventing it from skinning over before tiles are placed.
Hold the trowel at a 45-degree angle, creating uniform ridges that ensure proper coverage. Press mosaic sheets firmly into the adhesive with slight twisting motions, ensuring all individual tiles make contact. Avoid sliding sheets excessively, which can cause adhesive to squeeze up between tiles.
Working with Mesh-Backed Sheets
The mesh backing that holds mosaic tiles together requires specific handling. When pressing sheets into adhesive, work from the centre outwards to prevent air pockets forming beneath the mesh. These voids can lead to tiles popping off later or creating hollow sounds when tapped.
If adhesive does squeeze through between tiles, remove it immediately using a damp sponge before it sets. Dried adhesive between tiles is difficult to remove and interferes with proper grouting. Understanding common mistakes when using glass mosaic tiles helps you avoid pitfalls that compromise your installation's appearance and durability.
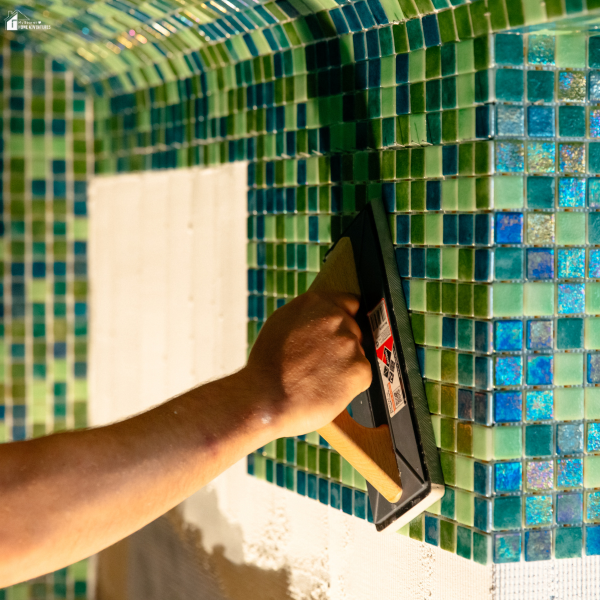
Grouting Glass Mosaics for a Flawless Finish
Selecting Appropriate Grout
Glass tiles perform best with unsanded grout, which won't scratch their delicate surface during application. Choose grout colours thoughtfully—they dramatically impact the overall appearance. Light grout creates a cohesive, seamless look, whilst contrasting grout emphasises individual tiles and adds visual texture.
Epoxy grout offers superior stain resistance and durability compared to traditional cement grout, making it worth considering for areas subject to heavy use or moisture exposure.
Application and Cleanup
Allow adhesive to cure completely—typically 24 hours—before grouting. Mix grout to a creamy, lump-free consistency and apply using a rubber float held at a 45-degree angle. Work the grout firmly into all joints, ensuring complete filling without voids.
Glass tiles require gentle cleaning during grout removal. Wait until grout begins firming but hasn't fully hardened, then wipe diagonally across tiles using a damp sponge. Rinse the sponge frequently and avoid removing grout from joints. Once dry, polish away any remaining haze with a soft, clean cloth.
FAQ Section
Can I install glass mosaic tiles myself or should I hire a professional?
DIY installation is certainly achievable for those with basic tiling experience and patience. Smaller projects like backsplashes or accent walls make excellent starting points. However, large-scale installations, complex patterns, or areas requiring extensive waterproofing benefit from professional expertise. If you're uncertain, consider hiring a professional for preparation work whilst tackling the actual tiling yourself.
How do I cut glass mosaic tiles without breaking them?
Individual glass tiles cut easily using wheeled glass nippers for small adjustments. For straight cuts through entire sheets, use a wet saw with a diamond blade designed for glass. Score the mesh backing first, then carefully cut through the tiles with minimal pressure. Always wear safety glasses, as glass fragments can be sharp.
Do glass mosaic tiles require sealing?
Glass itself is non-porous and doesn't require sealing. However, grout joints benefit from sealing, particularly in wet areas. Apply grout sealer once grout has fully cured (typically 48-72 hours after installation) to protect against moisture penetration, staining, and mildew growth.
Why are my glass tiles showing adhesive shadows?
Adhesive shadows occur when grey or dark adhesive telegraphs through translucent tiles. Always use white polymer-modified adhesive specifically formulated for glass tiles. If shadows have already appeared, the only solution is removing and reinstalling the affected tiles with appropriate adhesive.
How do I maintain glass mosaic tiles after installation?
Glass mosaics are remarkably low-maintenance. Regular cleaning with pH-neutral cleaners and a soft cloth keeps them sparkling. Avoid abrasive cleaners or scrubbing pads that might scratch the surface. Periodically check grout lines and reapply sealer as needed to maintain protection.

Conclusion
Glass mosaic tiles offer unparalleled beauty and versatility for transforming residential spaces. Whilst they require specific installation techniques and materials, careful preparation, proper product selection, and attention to detail during installation ensure stunning results that endure for years.
By understanding the unique properties of glass tiles and following proven installation methods, you can create luminous, professional-quality installations that enhance your home's aesthetic appeal and value. Whether you're embarking on your first tiling project or adding to your DIY repertoire, glass mosaics reward patience and precision with breathtaking visual impact.